Achieving the splits is one of the most sought-after flexibility goals in dance, gymnastics, and fitness. Whether you are a complete beginner starting from scratch or an experienced mover looking to refine your technique and push into oversplits, this comprehensive guide walks you through the anatomy, progressions, and safety protocols required to master the splits.
Flexibility is a journey, not a destination. The key to unlocking your splits lies in consistent, targeted stretching, understanding your body's mechanics, and avoiding the common pitfalls that lead to injury. Let's break down the science and practice of front splits, middle splits, and advanced oversplits.
The Anatomy of the Splits
Before diving into the stretches, it is crucial to understand which muscles are involved. A split is not simply about "stretching your legs" — it requires a coordinated lengthening of multiple muscle groups across the hips and pelvis. If even one of these muscle groups is significantly tight, it will prevent you from reaching the floor, no matter how hard you push.
The front split operates in the sagittal plane (forward and back), while the middle split operates in the frontal plane (side to side). Each type demands flexibility from entirely different muscle groups, which is why many people find one type far easier than the other.
| Split Type | Primary Muscles to Lengthen | Secondary Muscles Involved |
|---|---|---|
| Front Splits | Hamstrings (front leg), Hip Flexors / Iliopsoas (back leg) | Glutes, Quadriceps, Calves |
| Middle Splits | Adductors (inner thighs), Groin, Pectineus | Outer Hamstrings, Hip External Rotators, Piriformis |
| Oversplits | All of the above plus Hip Joint Capsule | Lower Back (lumbar spine), Active stabilisers |
Understanding this anatomy helps you target your training more precisely. If you are struggling with front splits, the issue is almost always either tight hamstrings in the front leg or tight hip flexors in the back leg — or both. For middle splits, the primary limiter is the adductor muscle group, which runs along the inner thigh from the pelvis to the knee.
Essential Warm-Up and Preparation
Never attempt to slide into a split with cold muscles. Cold muscles are prone to micro-tears and strains that can set your flexibility progress back by weeks. A proper warm-up increases blood flow, raises your core body temperature, and prepares your nervous system for deep stretching.

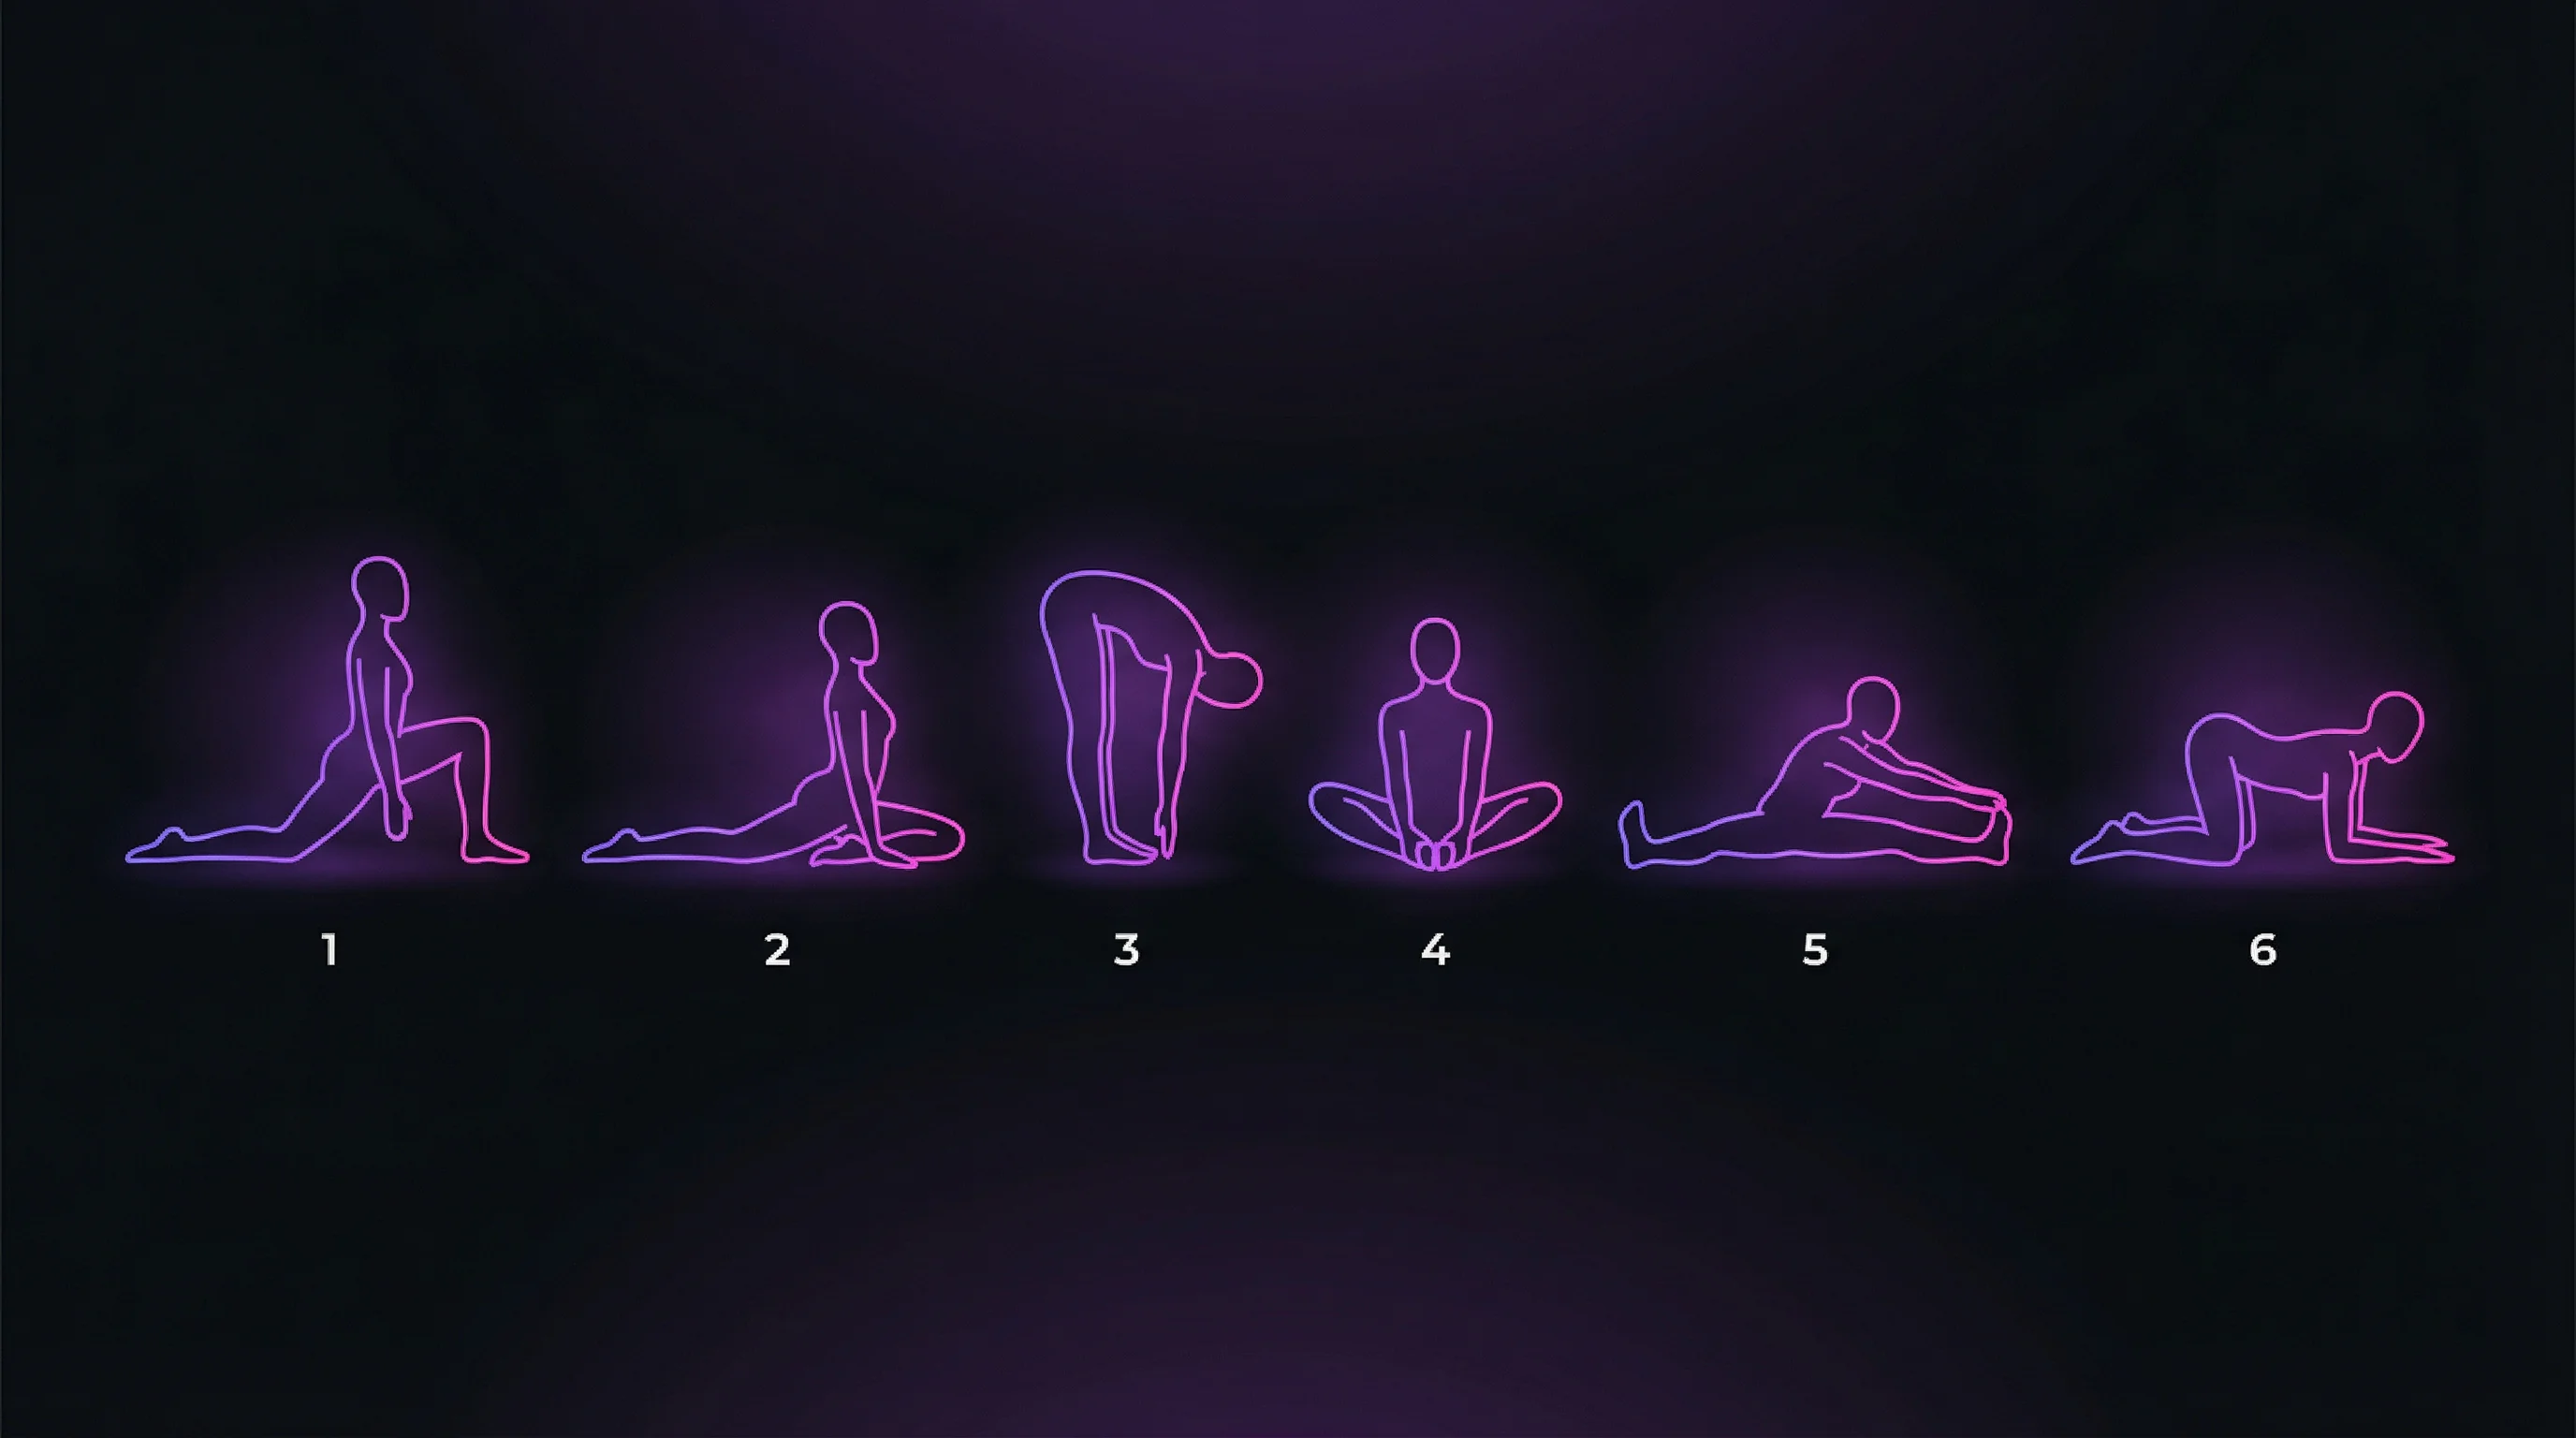
Begin with 5 to 10 minutes of light cardiovascular activity — jogging on the spot, star jumps, or dynamic movements such as leg swings and hip circles. Once your body is warm, move into targeted preparatory stretches. For front splits, focus on the runner's lunge, half pigeon pose, and seated hamstring stretches. For middle splits, incorporate the butterfly stretch, frog pose, and wide-legged seated forward folds.
The most effective warm-up stretches before attempting splits are:
- Runner's Lunge (Low Lunge): Targets the hip flexors and quadriceps of the back leg. Hold for 30 to 60 seconds each side.
- Half Pigeon Pose: Opens the hip rotators and glutes, which can restrict the front split. Hold for 60 seconds each side.
- Standing Forward Fold: Lengthens the hamstrings and decompresses the lower back. Hold for 30 to 60 seconds.
- Butterfly Stretch: Opens the inner thighs and groin for middle splits preparation. Hold for 60 seconds.
- Wide-Legged Seated Forward Fold: Directly mimics the middle split position. Hold for 60 to 90 seconds.
- Frog Pose: A deep groin opener essential for middle splits. Hold for 60 to 90 seconds.
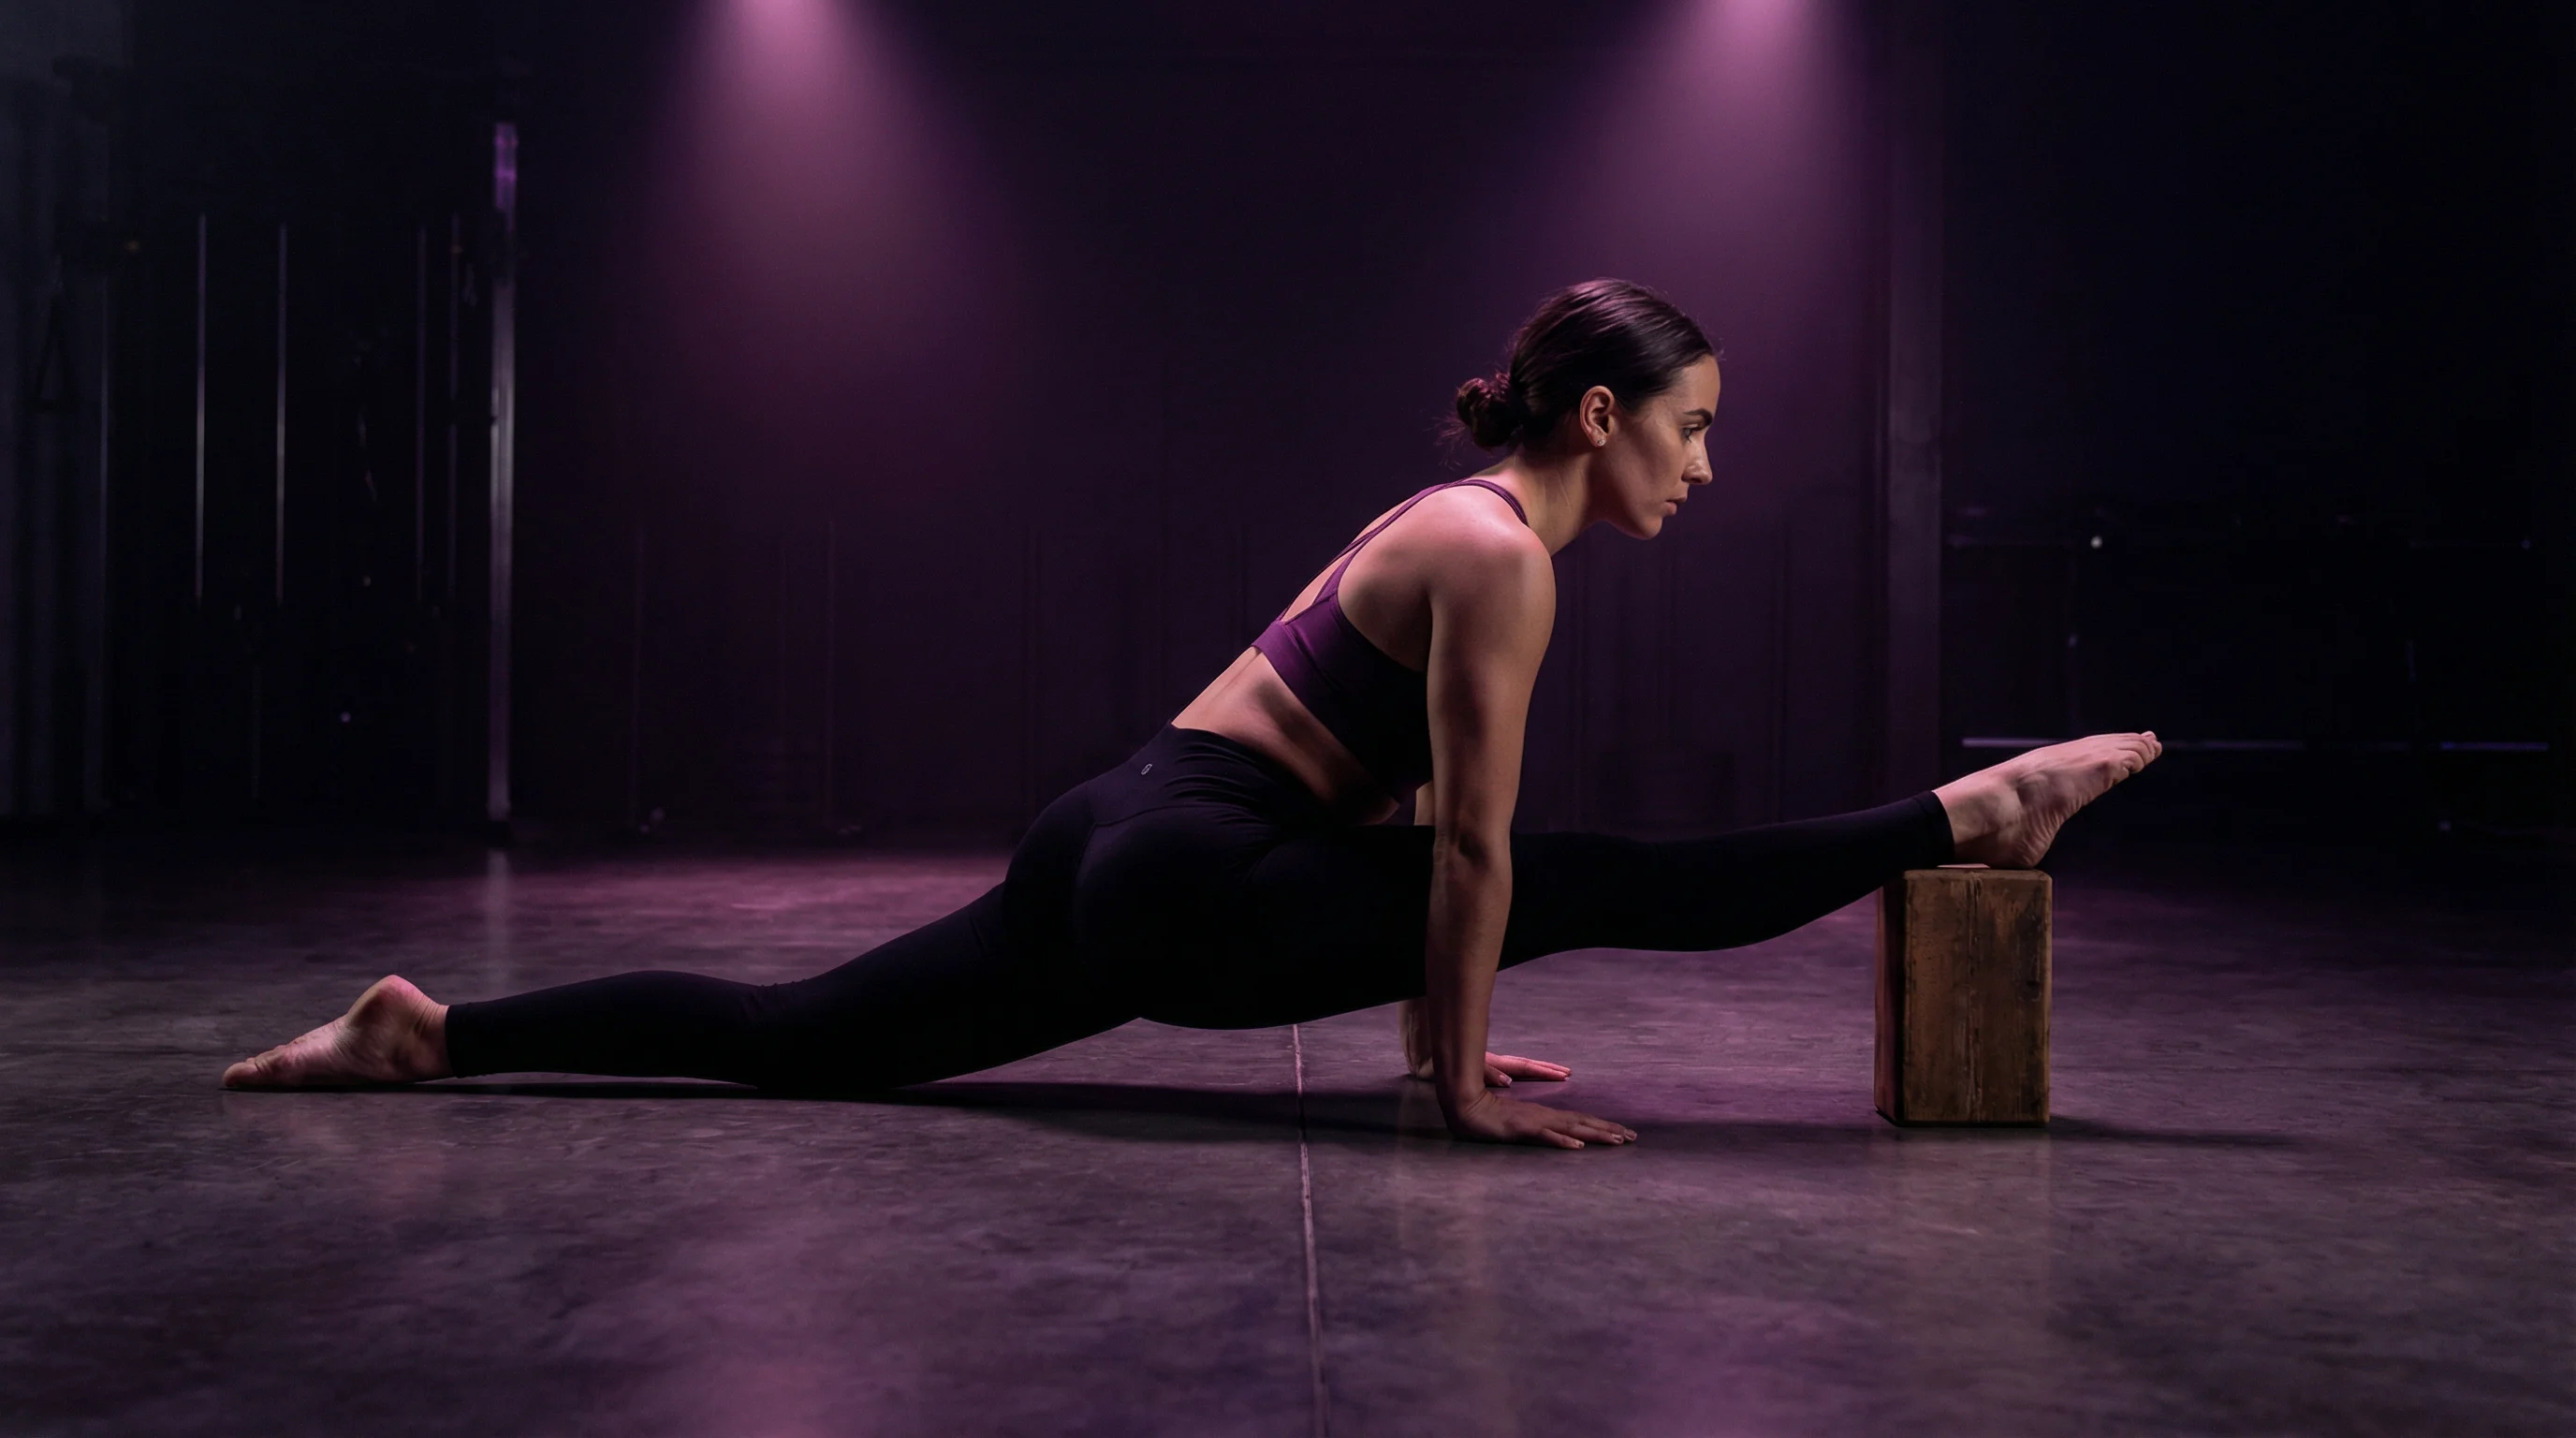
Mastering the Front Splits
The front split involves extending one leg straight forward and the other straight back, with both legs flat on the ground. To achieve a "square" front split, your hips must face directly forward rather than twisting open to the side. A twisted hip position is a common shortcut that reduces the effective stretch on the hip flexors and gives a false impression of depth.

Most people have a stronger side — the leg that feels more comfortable in front. This is completely normal. Train both sides equally to develop balanced flexibility, which is essential for dance, pole fitness, and aerial work.
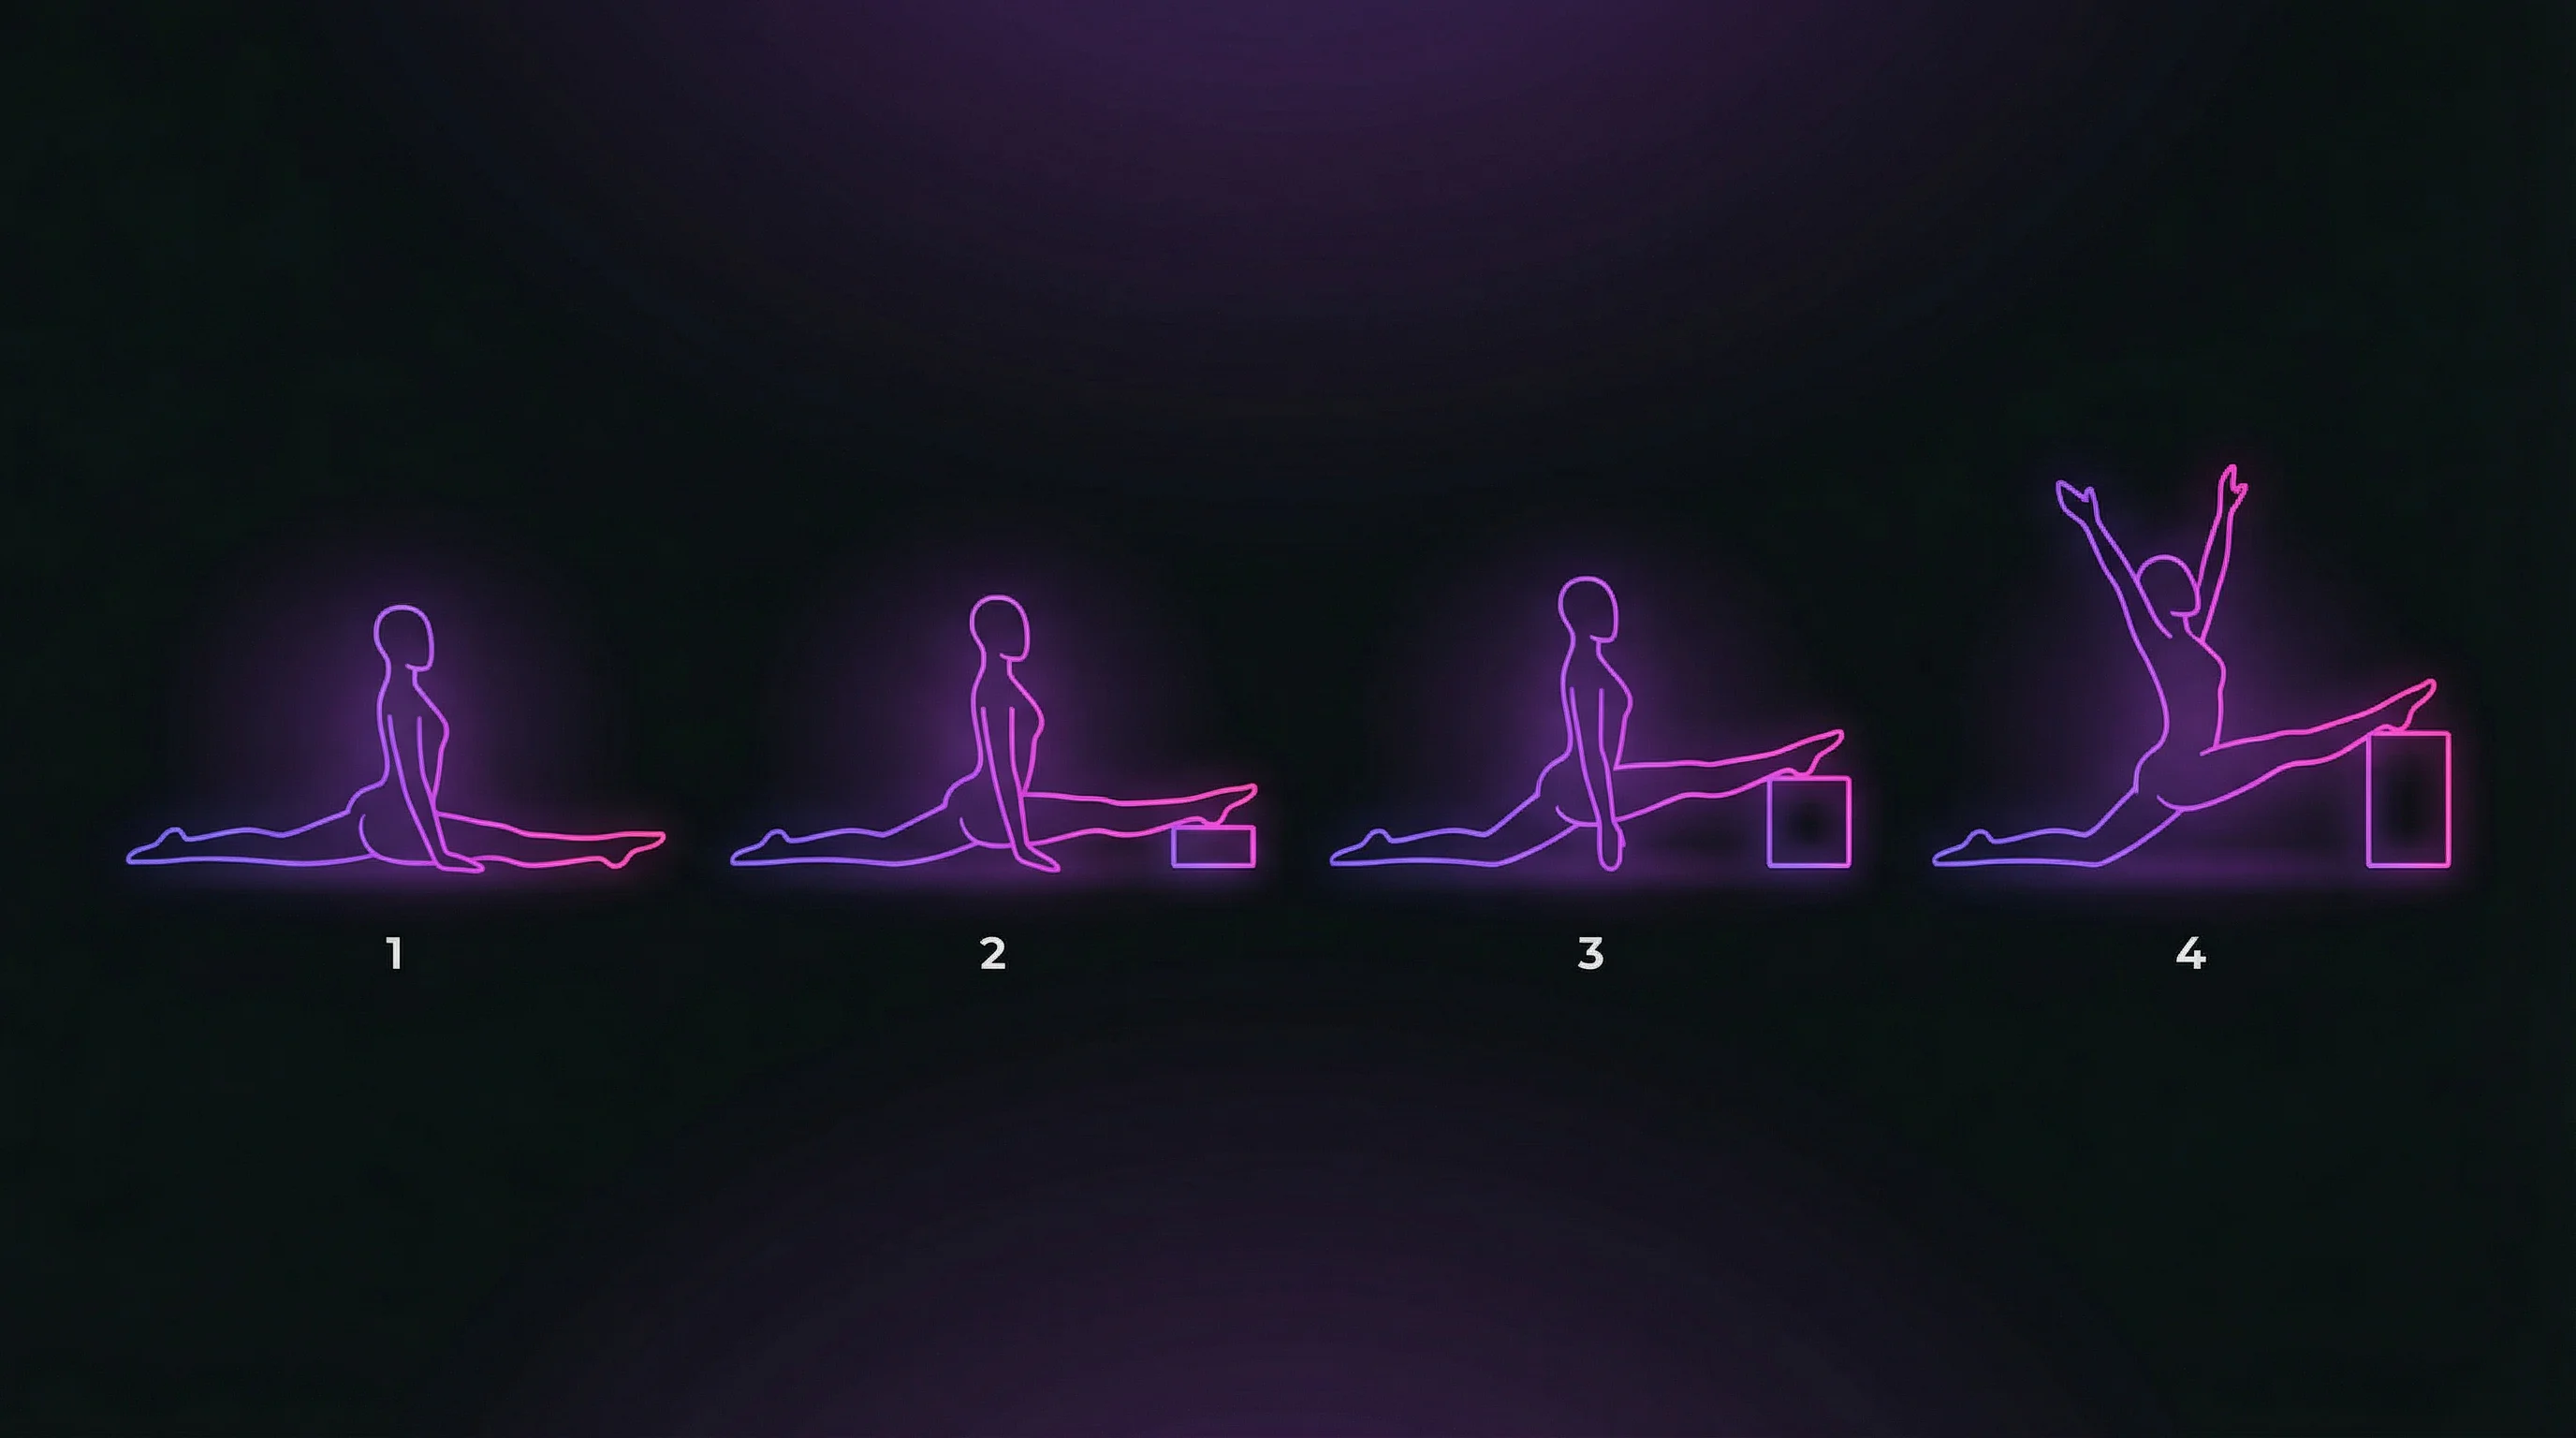
Step-by-Step Progression into Front Splits:
- Start in a low lunge position with your back knee resting on the floor or a mat. Place your hands on the floor on either side of your front leg for support. Yoga blocks under your hands can help if the floor feels too far away.
- Slowly begin to straighten your front leg by sliding your front heel forward. Keep your toes pointed or flexed, depending on your preference and the style you are training for.
- Simultaneously, allow your back knee to slide backward, keeping the top of your back foot resting on the floor. The back leg should be straight, not bent at the knee.
- Lower your hips toward the ground, ensuring your torso remains upright and your hips stay square to the front. Resist the temptation to let the back hip rotate open.
- Hold the position where you feel a deep, manageable stretch. Do not bounce. Breathe deeply and hold for 30 to 60 seconds, or longer if comfortable.
- To exit the stretch safely, bend your front knee and step back into a lunge before standing. Never push yourself out of a deep stretch quickly.
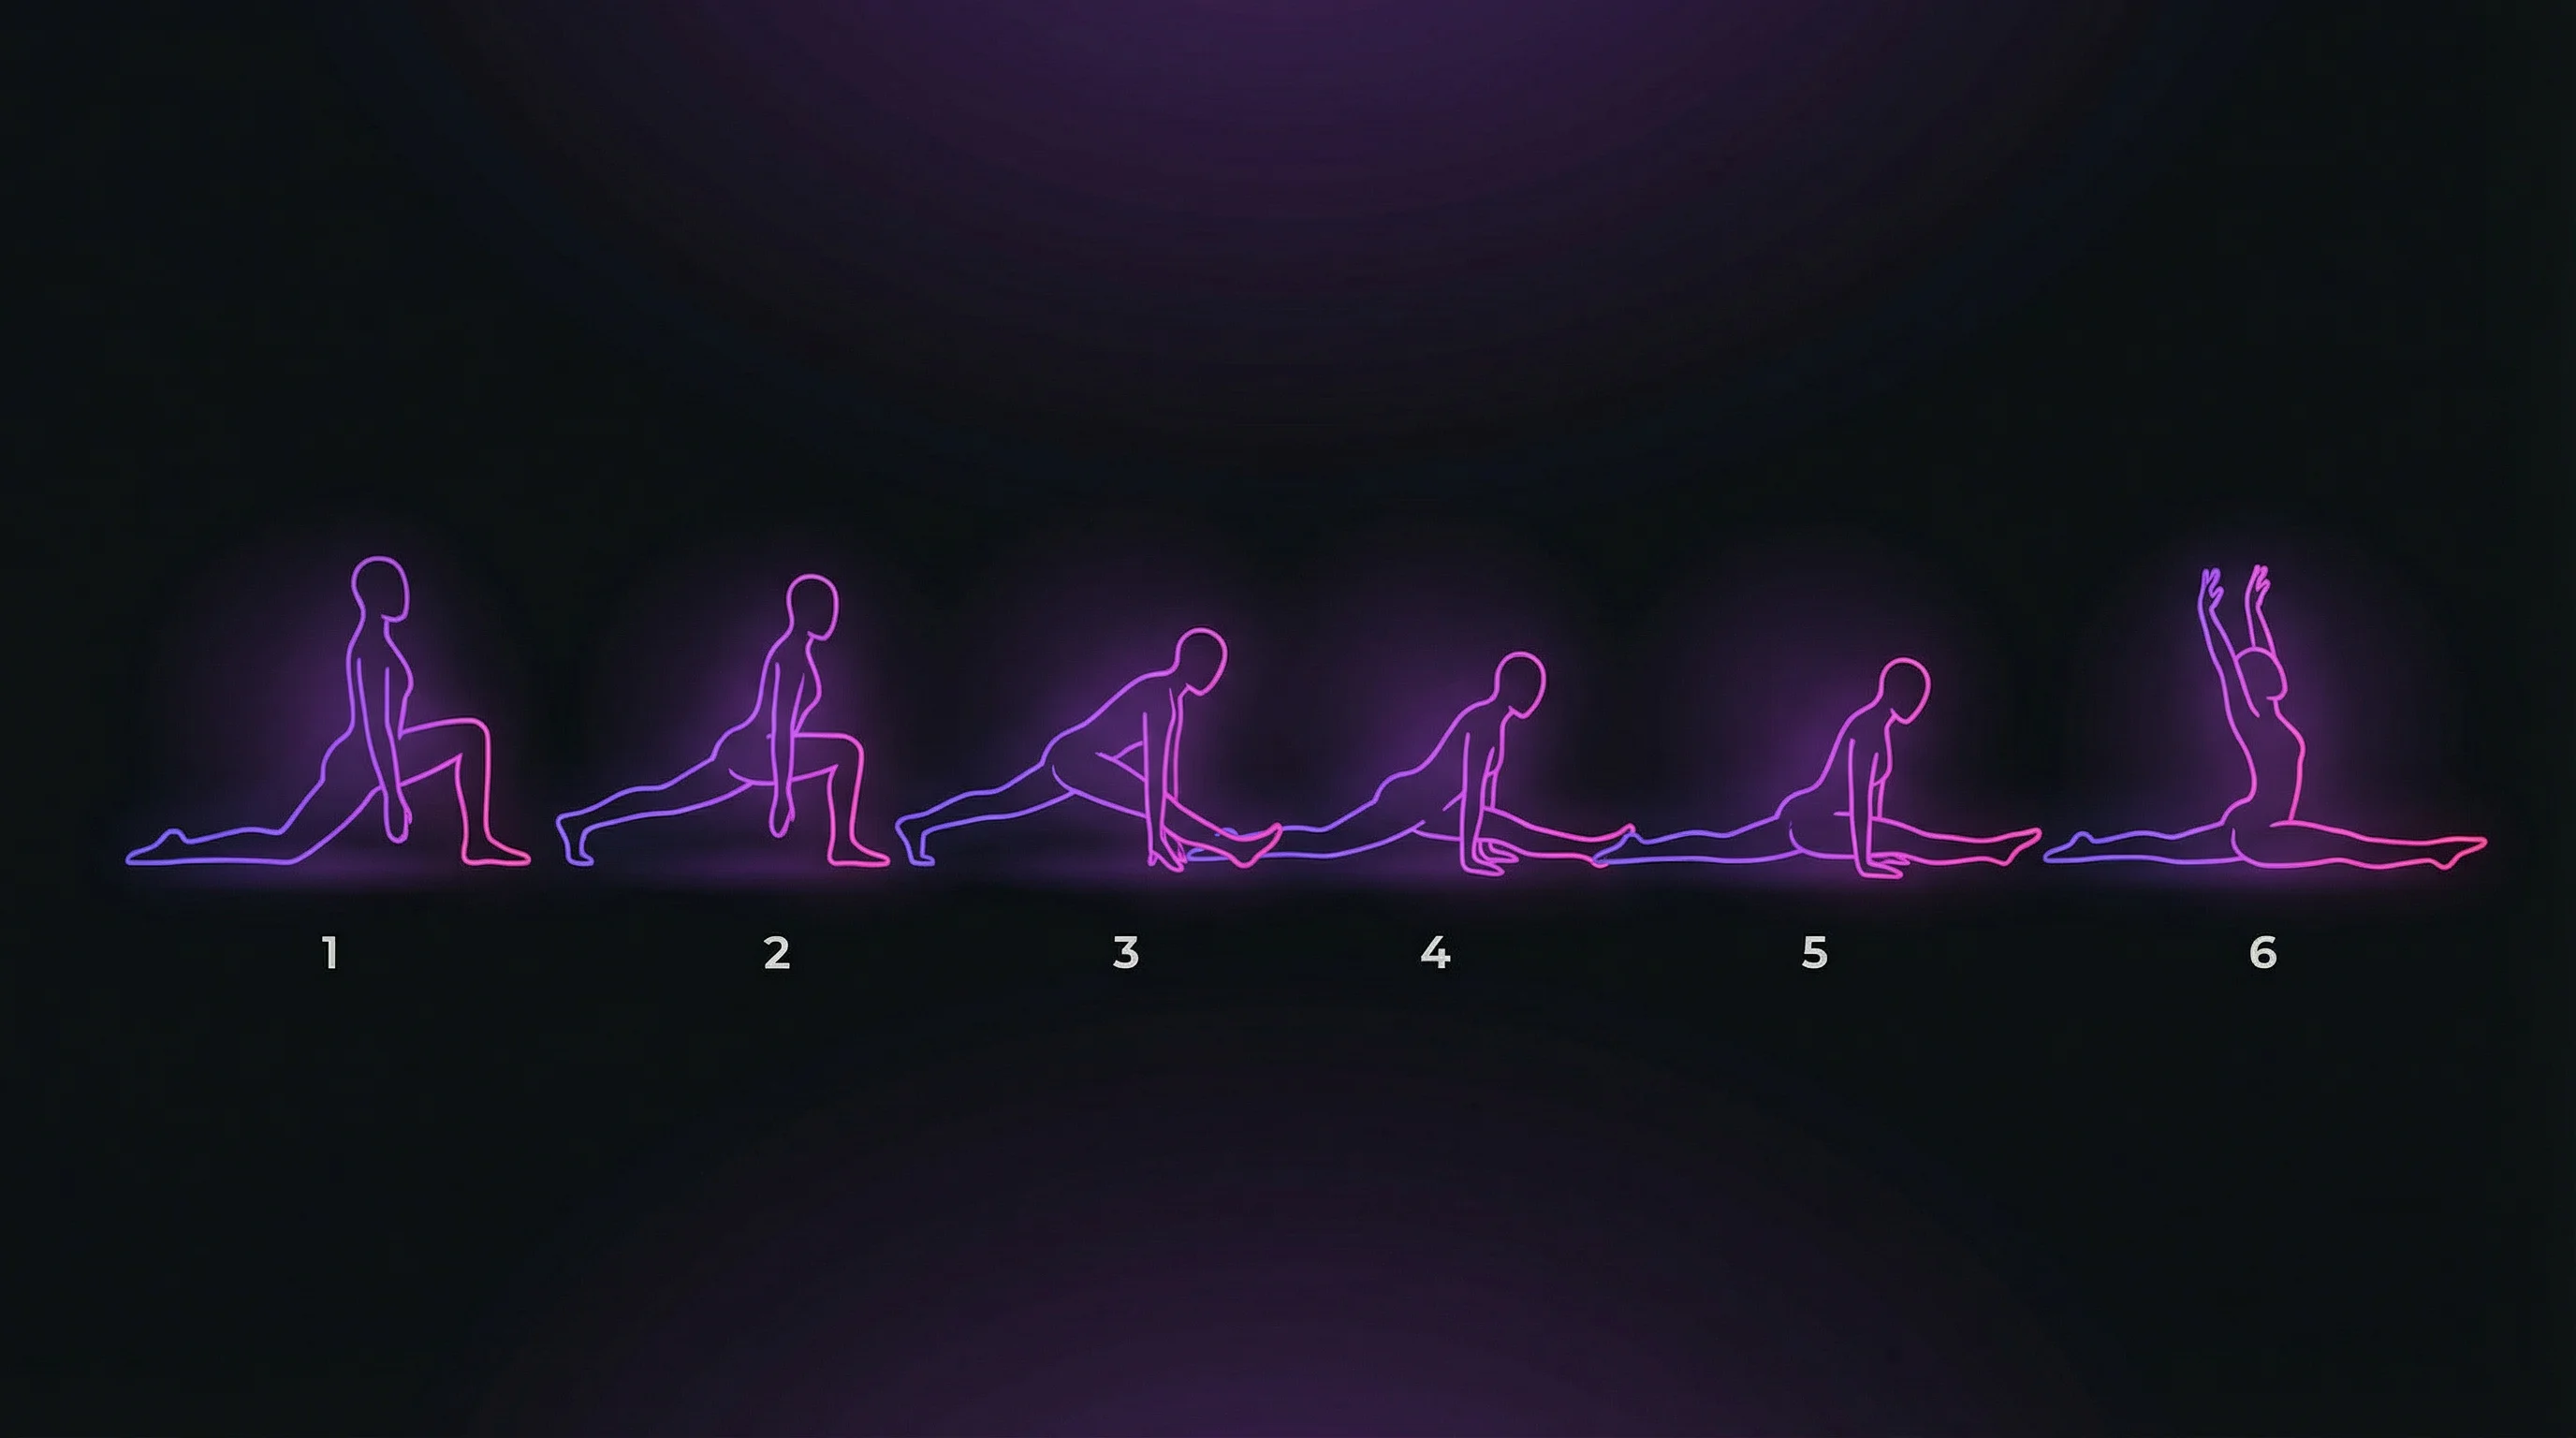
As your flexibility improves over weeks and months, you will find your hips gradually sinking closer to the floor. Use blocks or folded blankets under your front thigh as support while you build towards the full flat position. This is called a "supported split" and is an excellent training tool.
Conquering the Middle Splits
The middle split, also known as the straddle split or centre split, is widely considered more challenging than the front split. This is because the adductor muscles — the inner thigh muscles — are rarely stretched in everyday movement, making them particularly resistant to lengthening. Additionally, the hip joint itself must have sufficient mobility in the frontal plane, which varies significantly between individuals based on bone structure.
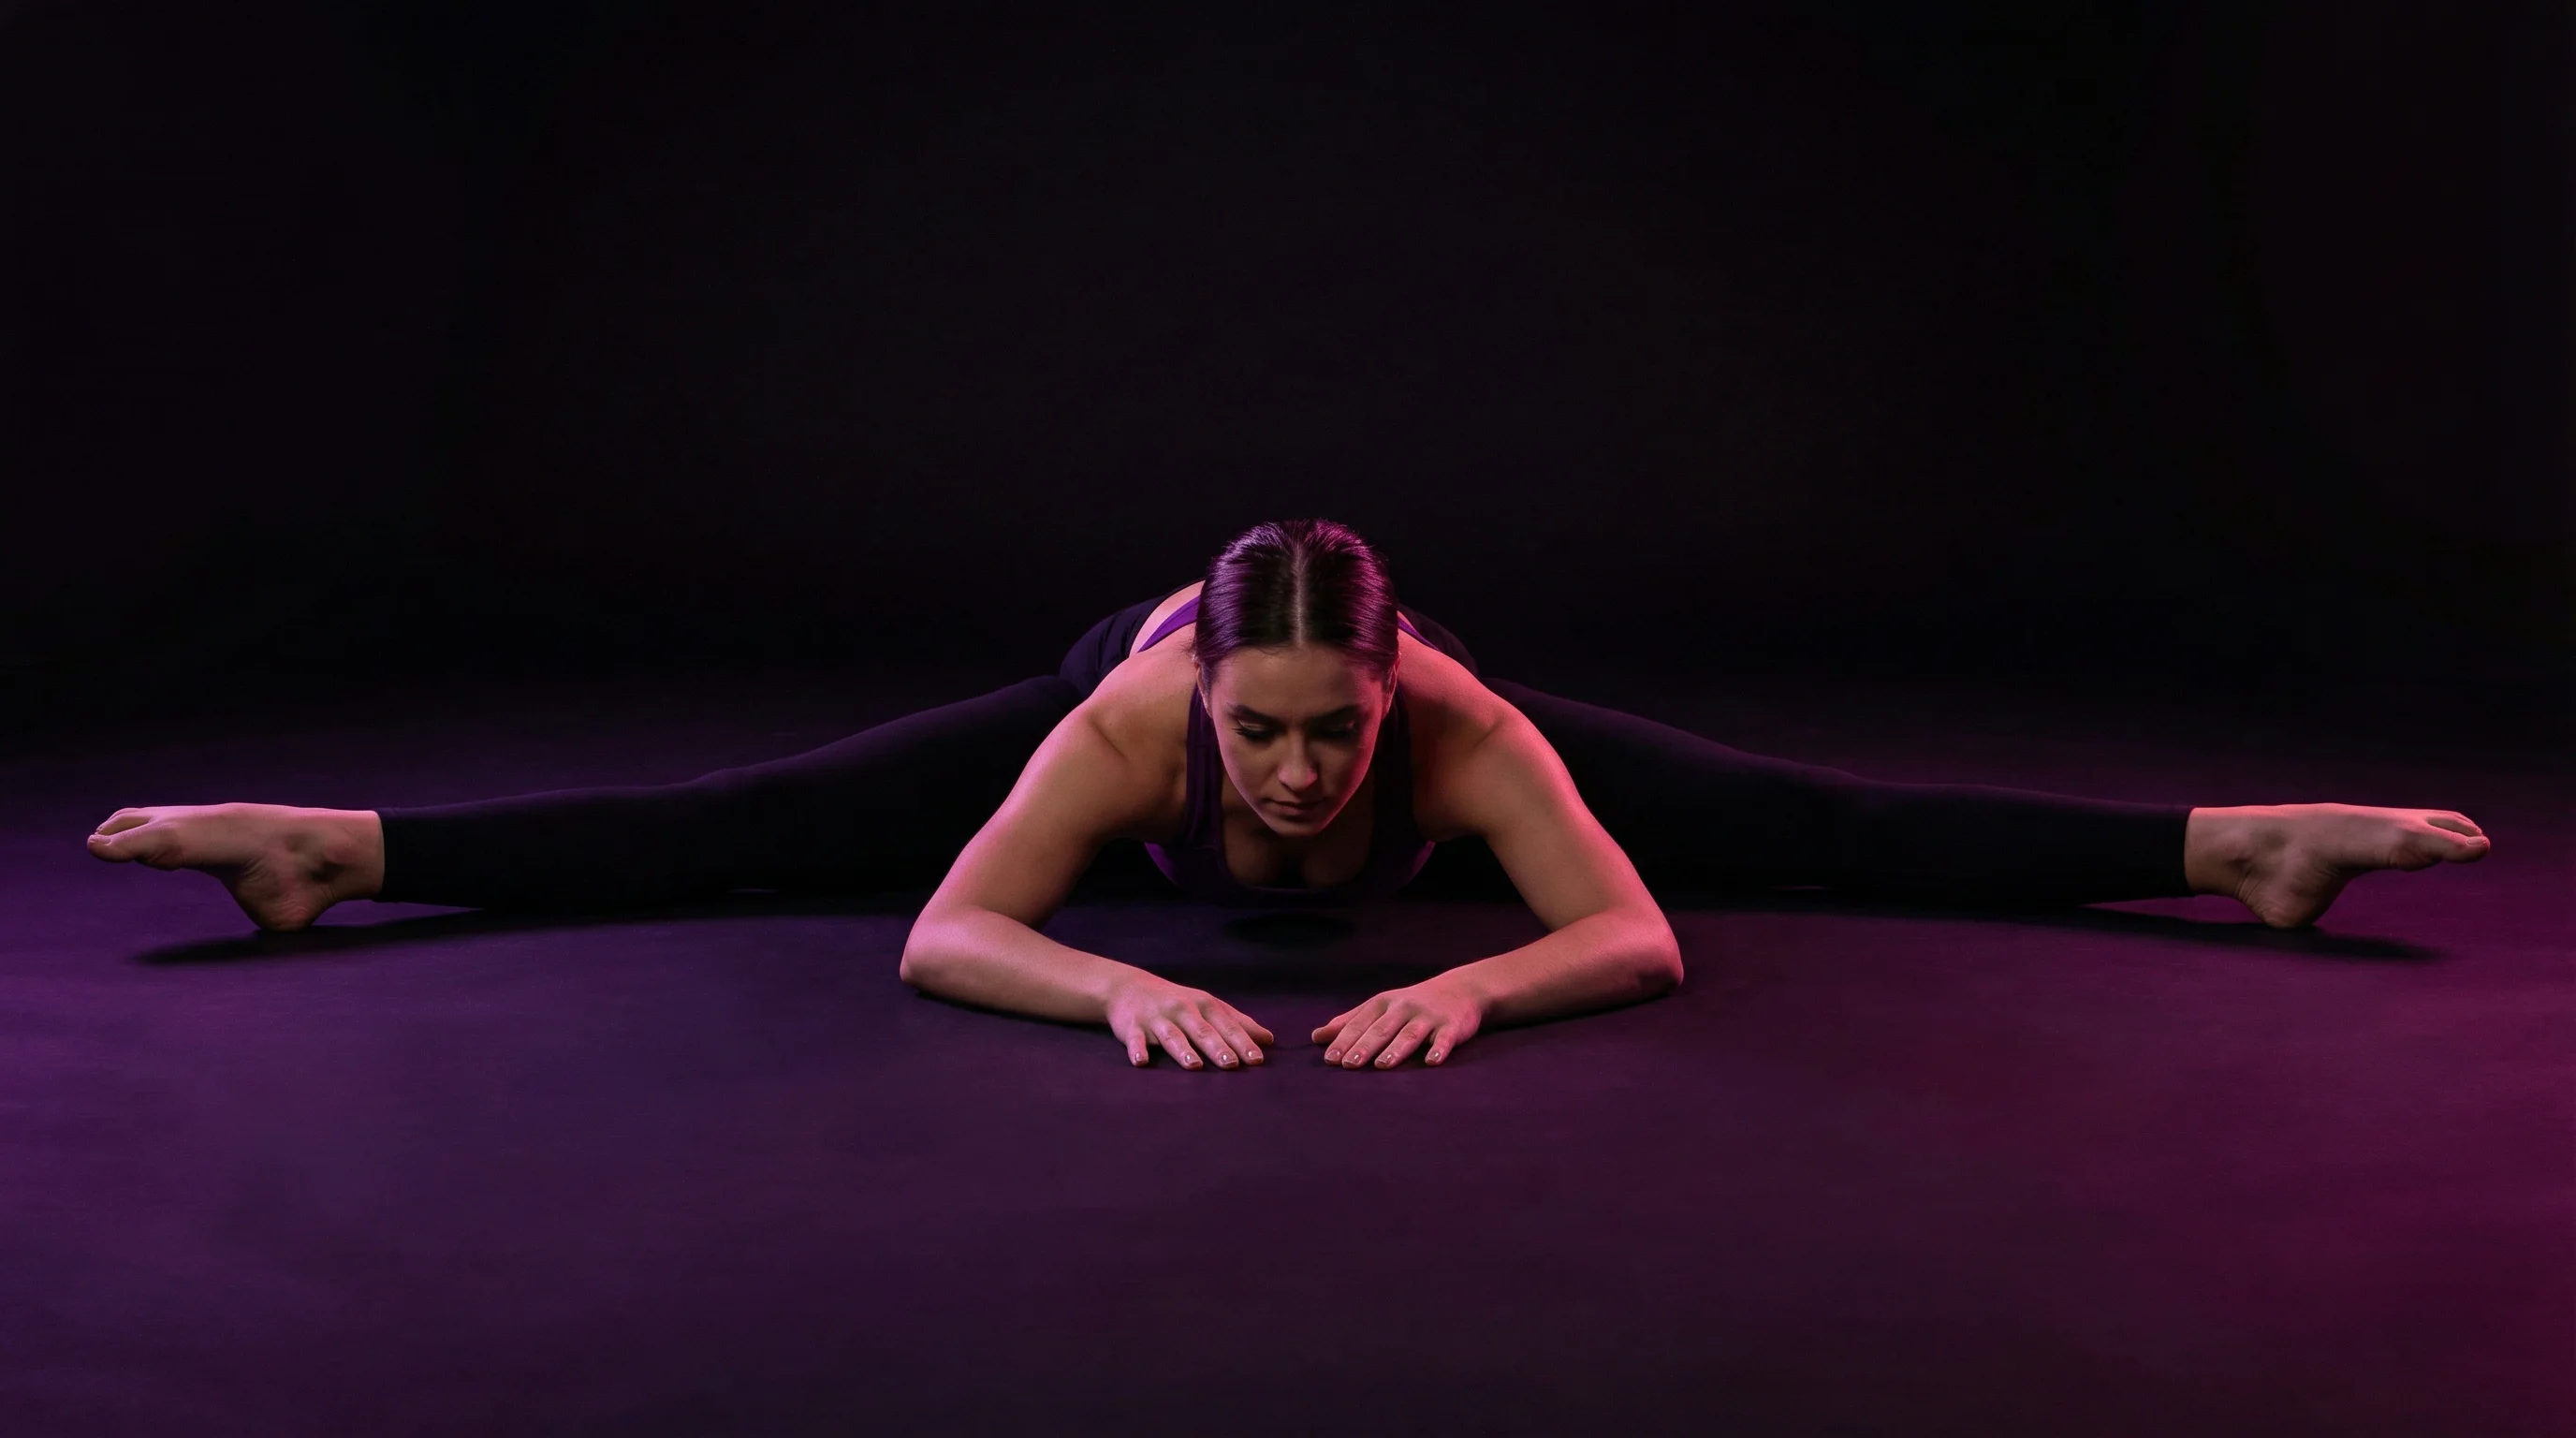
It is worth noting that some people will never achieve a flat middle split due to their hip socket anatomy. The angle and depth of the hip socket (the acetabulum) varies between individuals, and for some people, the femur (thigh bone) will make contact with the hip socket before the legs reach 180 degrees. This is a structural limitation, not a flexibility limitation, and no amount of stretching will overcome it. However, most people can significantly improve their middle split range with consistent training.
Step-by-Step Progression into Middle Splits:
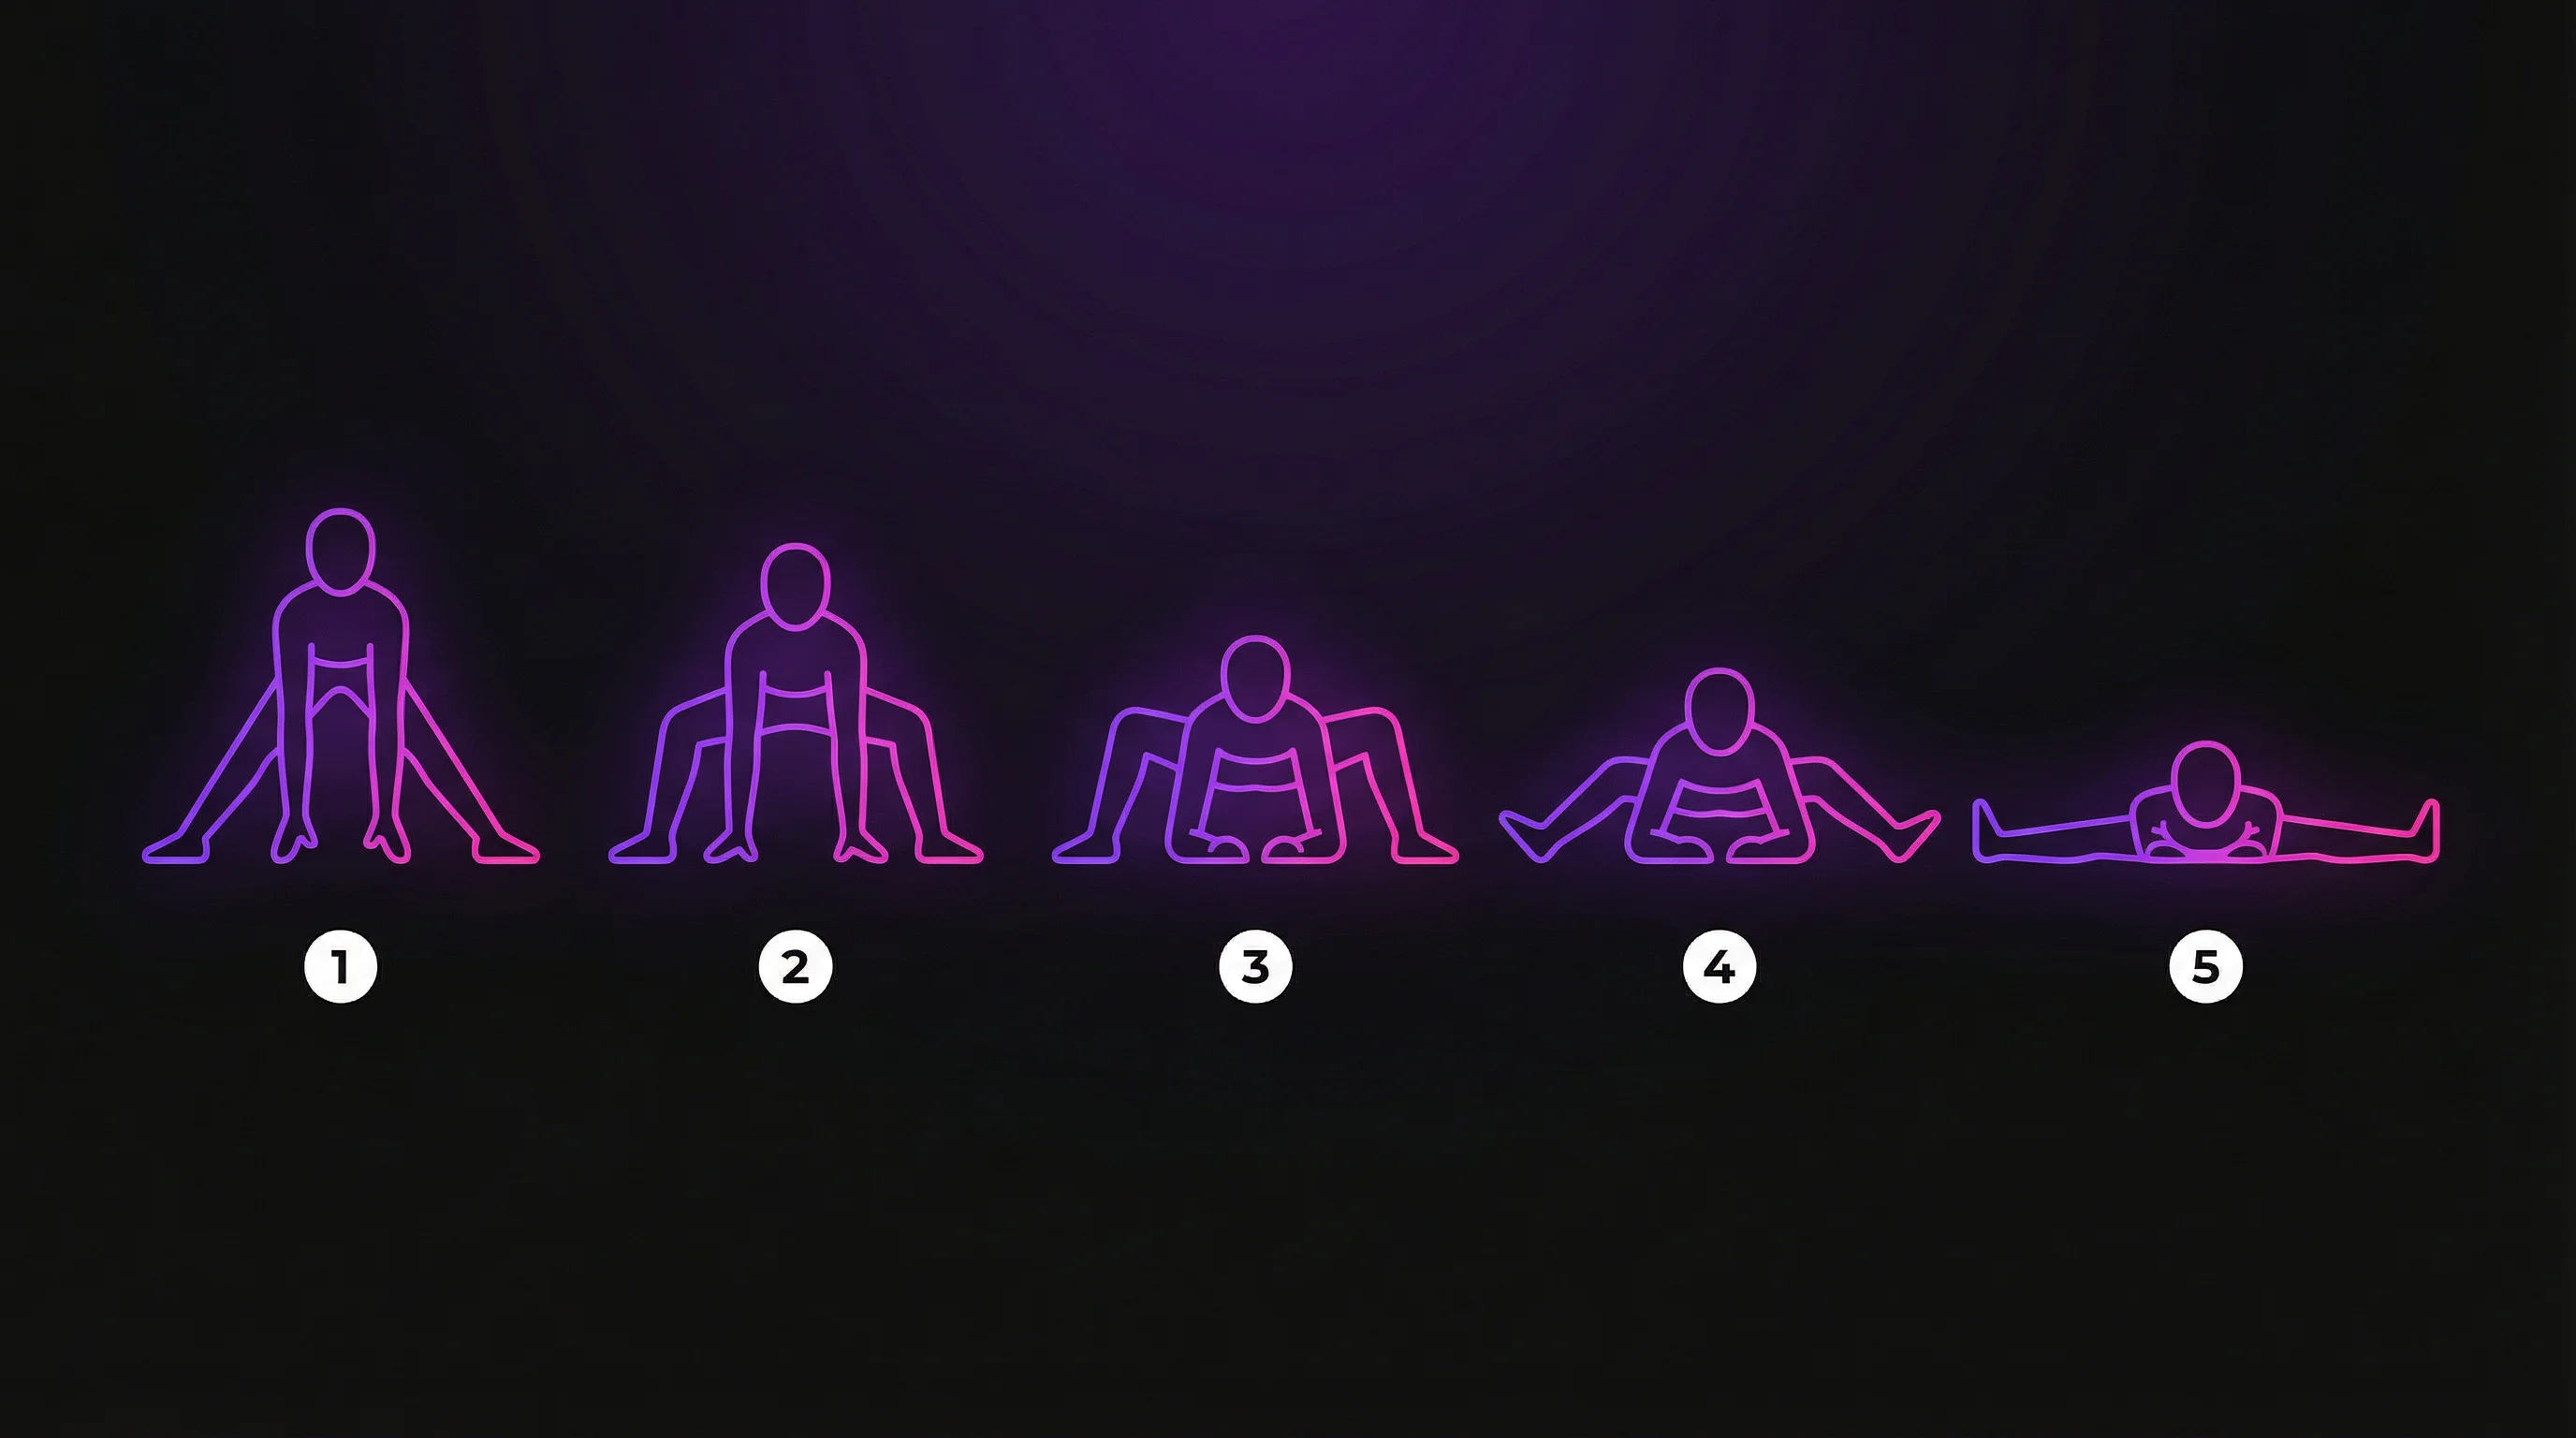
- Begin in a wide-legged standing position, with your toes pointing forward or slightly outward. Place your hands on the floor in front of you for support.
- Slowly slide your feet further apart, keeping your legs straight and your weight distributed evenly. If you are on a slippery floor, wear socks to allow your feet to slide. On a mat, you may need to move your feet manually.
- As you lower your hips toward the floor, you can drop down to your forearms if comfortable. Ensure your knees and toes are pointing upward (not toward the floor), which keeps the stretch in the adductors rather than rotating into the hamstrings.
- Hold the deepest point of the stretch without pain for 30 to 60 seconds, breathing steadily. You should feel a deep pulling sensation along the inner thighs.
- To exit, walk your hands back toward your body and carefully bring your feet back together, bending your knees as needed.
A highly effective training method for middle splits is the wall straddle. Lie on your back with your legs extended up the wall, then allow gravity to slowly open your legs into a straddle. This passive stretch is extremely effective because your muscles can fully relax against gravity. Hold for 3 to 5 minutes for maximum benefit.
Advanced Training: The Oversplits
Once you have achieved flat, comfortable splits on the floor, you may choose to train for oversplits. An oversplit is any split that exceeds a 180-degree angle between the legs. This is typically achieved by elevating the front foot (for a front oversplit) or both feet (for a middle oversplit) on a block, step, or chair.
Training for oversplits requires extreme caution. The risk of overstretching the ligaments or injuring the hip labrum (the cartilage lining of the hip socket) is significantly higher than with regular split training. You must ensure you have active strength in your end-range of motion, not just passive flexibility. If you can only hold your splits with the help of gravity and cannot actively lift your legs into the position, you are not yet ready for oversplit training.
Start by elevating your front foot on a small yoga block (approximately 5 to 10 centimetres high) and gradually increase the height over several months as your body adapts. Never increase the elevation by more than one block height per month. The following guidelines will help you train oversplits safely:
- Build active flexibility first: Practice active splits — holding yourself in the split position using your own muscle strength, without resting on the floor — before attempting oversplits.
- Use a spotter or mirror: Ensure your form is correct and your hips remain square throughout the stretch.
- Incorporate PNF stretching: Proprioceptive Neuromuscular Facilitation (PNF) involves contracting the target muscle isometrically for 5 to 10 seconds, then relaxing and sinking deeper. This technique is highly effective for advanced flexibility gains.
- Never train oversplits cold: Always complete a full warm-up and reach your flat split before attempting any elevated variation.
How Long Does It Take?
This is the most common question, and the honest answer is: it depends. Your starting flexibility, training frequency, age, and individual anatomy all play a role. However, research and practical experience provide some general benchmarks.
| Starting Level | Estimated Timeline | Training Frequency |
|---|---|---|
| Dancer / Gymnast / Martial Artist | 4 to 8 weeks | 5 to 7 days per week |
| Active person with some flexibility | 3 to 6 months | 4 to 5 days per week |
| Beginner with limited flexibility | 6 to 12 months | 4 to 5 days per week |
| Very tight, sedentary starting point | 12 to 24+ months | Daily, with patience |
The single most important factor is consistency. Stretching gently for 15 minutes five days a week will yield far better results than an intense one-hour session once a week. Your nervous system needs repeated exposure to the stretched position to gradually allow greater range of motion. Think of it as teaching your body a new habit, not forcing it into submission.
Safety Rules and Best Practices
Flexibility training should never be rushed or forced. The following safety guidelines are essential to protect your body and ensure steady, injury-free progress.
- Never force the stretch: You should feel a deep sensation of tension, but never sharp, shooting, or burning pain. If you feel pain, ease out of the stretch immediately. Pain is your body's warning signal — respect it.
- No bouncing: Bouncing (ballistic stretching) triggers the myotatic stretch reflex, causing the muscle to contract protectively. This can lead to micro-tears and inflammation, setting your progress back significantly.
- Breathe continuously: Holding your breath tenses your muscles. Exhale deeply as you sink into the stretch to signal your nervous system to relax and allow greater range of motion.
- Engage your core: Keeping your core muscles lightly engaged during splits training protects your lower back and pelvis from excessive strain.
- Do not have a partner push you: Having someone push you further into a stretch removes your ability to control the depth and can cause serious injury. All flexibility gains must be earned gradually and under your own control.
- Avoid stretching if injured: Do not stretch into a split if you have an active hamstring tear, groin strain, or hip labrum injury. Consult a physiotherapist before resuming flexibility training after any lower body injury.
Common Mistakes to Avoid
Many people plateau in their splits training not because of a lack of effort, but because of avoidable mistakes in their approach. Understanding these pitfalls can dramatically accelerate your progress.
- Skipping the warm-up: Attempting splits with cold muscles is the number one cause of flexibility-related injuries. Always warm up for at least 5 to 10 minutes before any deep stretching.
- Twisting the hips open: In a front split, allowing the back hip to rotate open makes the stretch feel deeper, but it reduces the stretch on the hip flexors and creates an imbalanced position. Always keep your hips square.
- Holding your breath: Tension in the breath creates tension in the muscles. Slow, deep breathing is as important as the stretch itself.
- Training only one side: Most people have a preferred side. Neglecting the weaker side creates muscular imbalances that can affect posture, movement quality, and injury risk.
- Expecting overnight results: Flexibility is a long-term adaptation. Expecting dramatic changes within a week leads to frustration and often to forcing the stretch, which causes injury.
- Stretching only when sore: Delayed onset muscle soreness (DOMS) after a stretching session is normal. However, stretching deeply when your muscles are already sore can compound the damage. On sore days, opt for gentle, active movement rather than deep passive stretching.
Frequently Asked Questions
Most people can achieve some version of a split with consistent training. However, individual hip socket anatomy means that a small percentage of people may never achieve a completely flat middle split, regardless of flexibility. Front splits are achievable for the vast majority of people who train consistently. The key is patience and consistency rather than force.
For optimal progress, aim to stretch 4 to 5 times per week. Daily stretching is fine as long as you are not overly sore from the previous session. The key is consistency over intensity — short, regular sessions are more effective than infrequent, intense ones.
Mild muscle soreness (DOMS) after a stretching session is completely normal, particularly when you are new to flexibility training. This soreness typically peaks 24 to 48 hours after training and should feel like a dull ache, not sharp pain. If you experience sharp pain during or after stretching, ease off and consult a health professional.
Deep, passive stretching (the kind needed for splits) is best done after a workout when your muscles are warm, or as a dedicated flexibility session following a thorough warm-up. Avoid deep static stretching before strength or power training, as it can temporarily reduce muscle force production. Dynamic stretching and mobility work are appropriate before any workout.
A passive split is when you use gravity or external support (blocks, the floor) to hold the position. An active split is when you hold the position using your own muscle strength, without resting on the floor. Active splits are significantly more demanding and are the standard required in dance and aerial arts. Training active flexibility — through exercises like active leg raises and standing splits — is essential for translating your passive flexibility into functional movement.
Ready to improve your flexibility?
Join our Stretch & Mobility Foundations classes in our Gold Coast classes on the Gold Coast. Our expert instructors will guide you safely through your flexibility journey.
Buy Now